Showing posts with label spring. Show all posts

Thursday, March 8, 2018

Spring Showers ~ with Cyndy G

Hello today I am bringing a cute little card from My Scrap Chick.  The Rainboot Shape Card.  I just love this card.  It could be use for so many different occasions.  A thank you card, get well card or a welcome spring card.

Rainboot card


I used some Heidi Grace paper I've had for a long time - waiting for the right project.  
It fits this boot perfectly.  

Close up of flowers coming out of the top of the Rainboot card

This card is very fitting for our weather here in NC.  Rainy one day and bright and sunny the next. 
I love the garden at my office this time of year.  The daffodils are always the first flowers to pop out and remind us that Springs is coming!  Thank you for stopping by.

Do what inspires you,
Cyndy G


Friday, May 5, 2017

Bird Houses ~ with Cyndy G.

Hello.  Thank you for stopping by.  Today I am sharing with you a project from SVG Attic using SDS Home Tweet Home.  These little bird houses are so cute and very easy to put together.

3d paper bird house

The cute little tag is from JGW Made of Snow.  The stamp is from the Graphic 45 - Time to Flourish set and the paper is Enchanted Forest.  I tied it all off with some Krazy for Kraft Trendy Twine.

close up of 3d paper bird house

Last week was National Volunteer Week and I made 20 of these as a Thank You gift for our  
Master Gardener volunteers that came for a luncheon to honor them.

twenty paper birdhouses

New to SVG Attic?  Check out these awesome places!


Do what inspires you,
Cyndy G.


Friday, April 21, 2017

Surprising Spring Card ~ with Cyndy G.

Hello today I'm on the SVG Attic blog.  I've got a wonderful card to share with you from JGW Poinsettia Passion.  It is the Poinsettia Doilly Frame Card and no I'm not starting my Christmas cards yet, even though I think I would have to in order for me to have enough time to actually get them done :)

I've turned it into a pretty spring card by using bright colors.

Spring card

I used Graphic 45 - Parisian Cafe and Totally White Trendy Bakers Twine from 

Spring card

This is one of my favorite cards and I love how it turned out with these bright colors.
Thank you for stopping by.

New to SVG Attic?  Check out these awesome places!


Do what inspires you,
Cyndy G.

Friday, February 10, 2017

Springtime Bunny ~ with Cyndy G

Happy Friday, thank you for stopping by.  Today I am sharing with you the wonderful  JGW 3d Button Jointed Bunny.  I just love the 3d figures.  I decided to shrink my bunny, I cut her at 70%.  She is about 9" tall (top of head).  I also used the garden hat from JGW Gaby's Garden and glued her ears to it.

3d paper bunny

I used Trendy Twine, Twisted Blue Berry around the brim of the hat and to tie her joints together.  The paper is Graphic 45, Robin's Egg from Botanical Tea.

3d paper bunny with hat

I also used some flower buttons I had in my stash.  I just love how everything came together.  Thank you again for stopping.  Have a crafty weekend.

Do what inspires you,
Cyndy G.

Friday, February 26, 2016

Spring is in the Air ~ with Cyndy

I know some of you are still getting snow but here in the South, the flowers are starting to bloom!  Today I decided to share a spring project and with Easter right around the corner - it's very early this year - it's time to start thinking spring.


The egg is the pineapple out of the JGW Tropical Haven kit.  I hinged the top with one of the decorative panels.  Instead of gluing the tab over the top of the egg, I glued it to the lid. The paper on the egg is from Graphic 45, Once Upon a Spring Time.  This is one of my favorite stacks!


The bird is from the SDS Home Tweet Home kit.  He is a little box.  I shrunk mine down to 2" so he would fit in the egg.  I just love how he turned out.  Thank you for stopping by today.

Do what inspires you,
Cyndy G.

Friday, April 10, 2015

Spring is in the Air

I just love this time of year!  If it weren't for the pollen I would be outside all the time.  Today I decided to make a gardening set.  I used elements from JGW Gaby's Garden.  Such a cute set!

Spring garden scene

Of course with Spring here, we all know Summer is right around the corner.  With that comes bathing suit season, ugh!  So I thought instead of candy I would put little seed packets in the pot.  Wouldn't this make a nice gift for someone you know who likes to garden.

Paper pot with seed packets

Plus if you use compostable paper you could add the soil right to the pot with the seeds and plant the whole thing.


Creeping Phlox

I used paper from Graphic 45, Time to Flourish.  This paper is so pretty and has some lovely spring colors.

Spring garden scene

I hope you have enjoyed my project today and it has given you some new ideas to try.  Happy spring.

Do what inspires you,
Cyndy G.

Tuesday, March 3, 2015

Dreaming of Spring

Today I chose the Watering Can from SDS Water Wishes and the Garden Apron Card from JGW Blooming Card Kit.

3d paper watering can and garden apron card

I used Graphic 45, Once Upon a Springtime again.  I am in love with this paper.  Everything you make with this paper turns out beautiful.

I used the flat daisy also from the SDS Water Wishes, to accent the watering can.  I left off the upper handle because I plan on using this as a gift bag.

3d watering can front view

I used a chip board frame that came with the paper pack and a chip board tag.

3d paper watering can side view

I love this apron card.  The gardening tools come out of the pockets.  They are so cute.

Garden apron card showing removable trowel, rake and glove

If you know someone who loves gardening any of  these projects would make the perfect gift!

Garden apron card

I hope you have enjoyed my project today.  Here's to hoping spring comes soon!  I am tired of the cold weather.

Do what inspires you,
Cyndy G.

Wednesday, October 1, 2014

SVGcuts Lamp Challenge

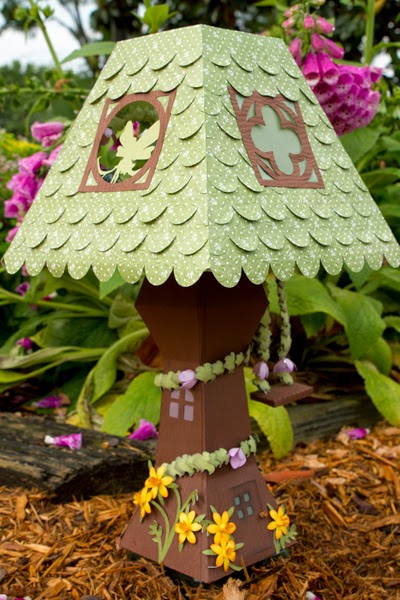
It is time again for another challenge.  This time we have to use the lamp file from Maison de Madeline Kit. I took a lot of time thinking about this one. We could use any other file from SVGcuts that we wanted to use, the shape of the the lamp could not be changed. The first sample I put together was an apple tree. The old kids hand game, say say old playmate, kept going through my head. One part of it says "climb up my apple tree". While I was working on my apple tree another contestant turned in a lamp that was a tree. Now, I know I have to push the envelope on this one.

I re-read the rules a hundred times but this one time the part about using a fairy file caught my eye. When I look at the files on the SVGcuts website I found the Woodland Fairies Collection and I feel in love with the little girl sitting on the branch.

3d paper lamp in garden setting

I spent a lot of time searching the internet looking at pictures of fairy houses. Then when I was shopping at Michael's looking for anything to use with my lamp I found fairy lights in the wedding section. Now I had everything I needed to make my lamp.

I made the lamp the largest size possible to fit on the 12x12 mat. See diagrams below for how I put the doors and windows in the lamp. I also made panels for the trunk of the tree so I could emboss them without weakening the base of the lamp. I added the fairy to the lamp shades front panel.

screen shot of how to cut lampscreen shot of how to cut lampScreen shot of how to cut lamp

 I decided to put the battery pack for the lights inside the trunk of the tree.  So I waited to put the bottom on.  I put the pack inside the door and started the string of lights out the back corner of the base and wrapped it around the trunk.  Now the hard part.  It took me awhile to come up with how to use the lights inside the shade.  I also knew I wanted to have a swing that had flowers and leaves as the chains.  This image below is how I worked out the lights in the shade.

Screen shot of how to string lightsI used the tiny holes as guides and cut from the outer edge to the holes.  I took the lights up through the bottom right holes and around the arch in the back of the lamp, out through the hole on the bottom left, took the lights across the bottom of the shade (on the outside), up the next hole and right back out the one just above it, (here is where I made my swing).  I strung the lights through the board for the swing (then glued it together) and back up into the shade.  The string was just long enough (1/2 inch) to use in the bottom of the tiny lamp I made for inside the fairy lamp.

I used a bunch of leaves and flowers (I used the flowers over each light) to cover the fairy lights.  I used hot glue to put the leaves on.  I cut the flowers open from the outer edge to the center, cupped the light then glued the petals over each other to make the flower cover the light.

Then I made some furniture for my fairy house.  I used the desktop jar from Happy Trails for the potbellied stove and used a tea light to make it look like a fire in the stove, the pool table from The Green Room for the bed, the pedestal from Poplar Street Tulips as a table and the free Adirondack chair at the table and a mini lamp.
Close up of lamp in garden

Inside of lamp showing a small fairy house

View inside lamp showing fairy bed and clock

Close up of door and swing on lamp

Picture of lamp lit up

inside of lamp lit up showing a glowing pot belly stove

I won first price with this entry!  I have to admit, I got butterfly's when I was putting it together.  I knew I had made something special.  I still can't believe I won.  I don't know if that will ever sink in!  The price for first place is a Silhouette Cameo!  How great is it that Leo and Mary of SVGcuts have such wonderful giveaways.