Showing posts with label SVG Cuts. Show all posts

Saturday, September 23, 2017

Snowman Box ~ with Cyndy G

Hello today I wanted to share a project I made using SVG Cuts files.  It was designed by Kathy Helton - Frosty Flake Snowman.  I have wanted to make him for some time now and finally had a chance.  I love him.  He looks great in bright colors!

Snowman made of boxes

The paper I used was an old DCWV stack I've had for several years.

Snowman made of boxes

Doesn't he have the cute face?  Thank you for stopping by.

Do what inspires you,
Cyndy G.


Monday, August 7, 2017

Halloween Puzzle ~ with Cyndy G.

I have had this puzzle on my Pinterest board for a long time now and thought it was time to give it a try.  The original design was done by Thienly for SVG Cuts.  You can find all the instructions for making it here.   I decided to use files by Doodlebug that I purchased from the Silhouette Design Store or on Lori Whitlock's site here, they are so cute and worked really well on this project.

Hunchback image on puzzle

Aren't they just adorable!

ghost puzzle

My daughter told me I needed to make a lot of these and sell them because everyone will want one.  She is the sweetest.

Frankenstein puzzle

The great thing about these is they are 6x6 so you can use some of your 6x6 paper pads to make these.

Bat puzzle

Each block is a 2" square.  To make the puzzle picture, you first assemble the image on a 6x6 sheet of paper and then cut it into 2" squares.  After you have cut the squares you attach one section to each of the cubes you have made.

Mad scientist puzzle

It does take a little time to put all the pieces together but there is nothing too difficult about this project.
When you are finished seal your work with a little mod podge.

Bride of frankenstein puzzle

Thank you for stopping by.

Do what inspires you,
Cyndy G.

Thursday, December 31, 2015

Stocking Card

I wanted to share a couple of projects I made using some SVG Cuts files.  The Stocking card I created using More Christmas Box Cards.  I just love the way the front of this card is designed to look like a cable knit.

Stocking card

I also made the Christmas tree from the Christmas Cafe SVG kit.  What a clever way to give kcups.

Tree holder for k cups

Thank you for stopping by.  I hope everyone had a wonderful Christmas holiday.

Do what inspires you,
Cyndy G

Sunday, November 2, 2014

Casino Night - Volunteer

My boys attend Saint Michaels Catholic School.  This year we have a new principal and she wants to do a casino night for a fundraiser.  So I volunteered to be on the decorating committee and thought my craft might come in handy.

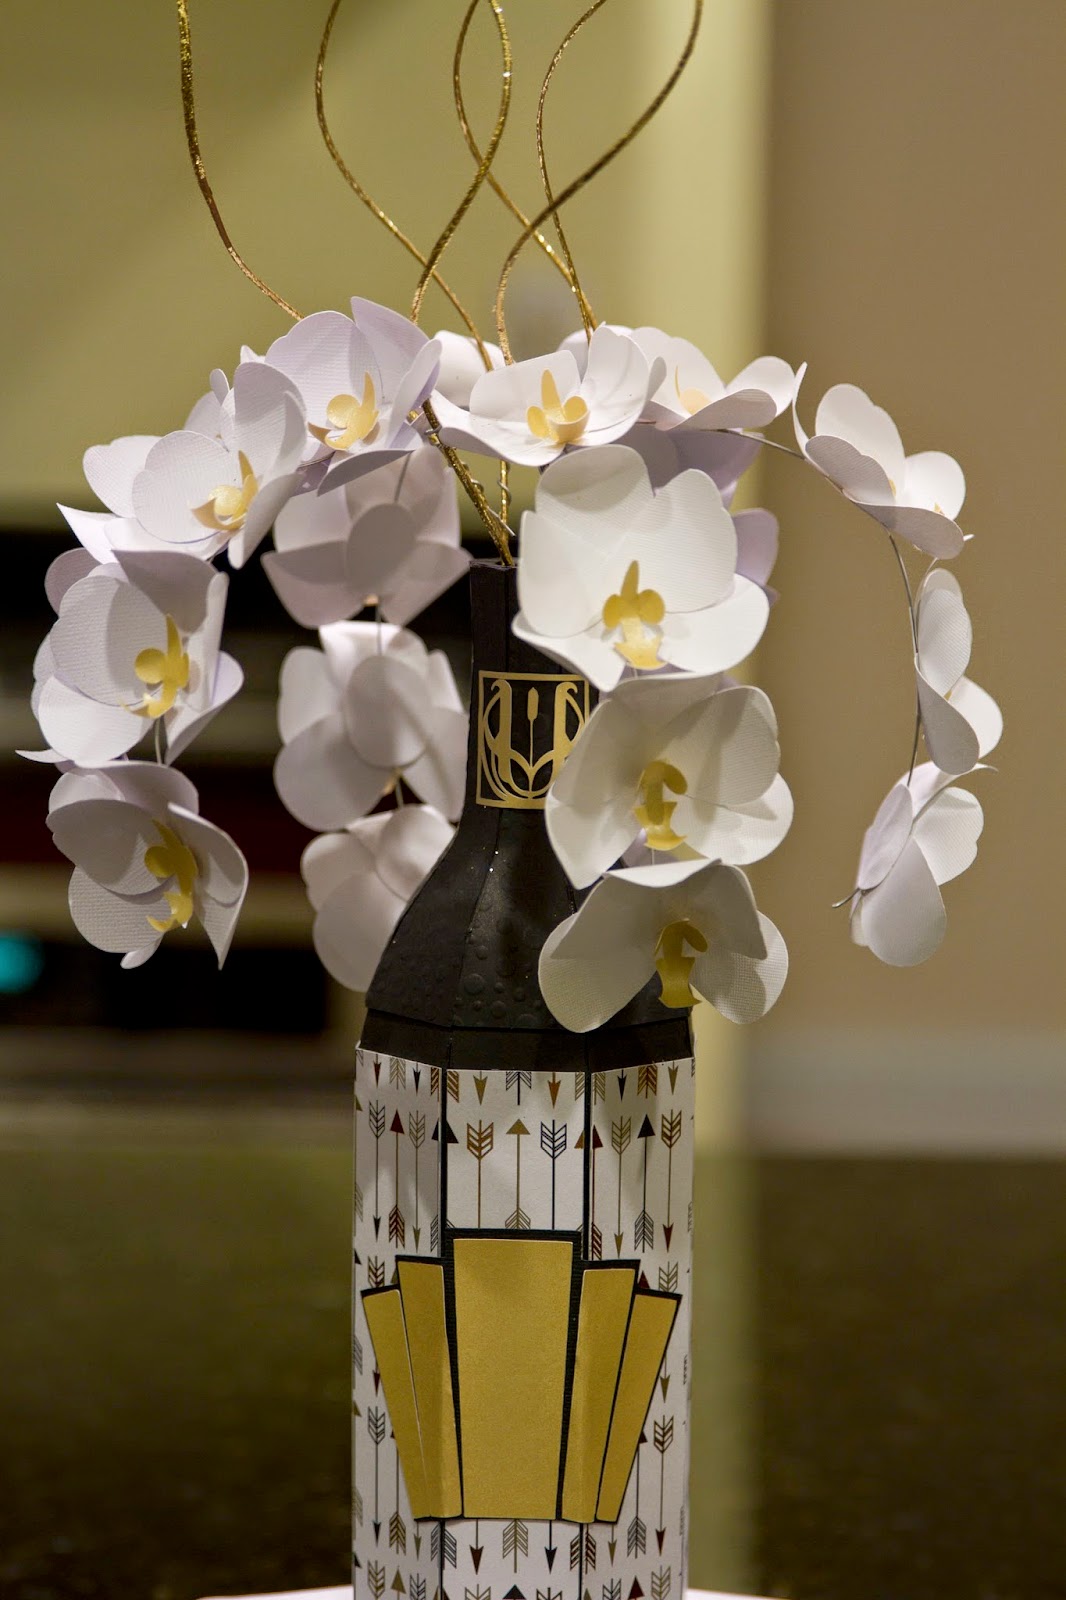
So I turned to SVG Cuts for the Champagne bottle and dice; and Craftsuprint for the orchid.  I found these nice gold painted branches at Hobby Lobby.  Here is what I put together:

paper champagne bottle with orchids casading out of the top standing on top of large dice

I found some art deco designs to add to the bottle to give it a little more design.

How did I do it?  I attached the flowers to floral wire (silver) with a hot glue gun and attached a little circle on the back to hid the glue a wire on each flower.  Then I attached the wire to the branch by twisting it on about an inch above the top of the bottle and curved it give it the feel of a fountain.  It didn't take much wire to attach to the branch, I left about two inches.

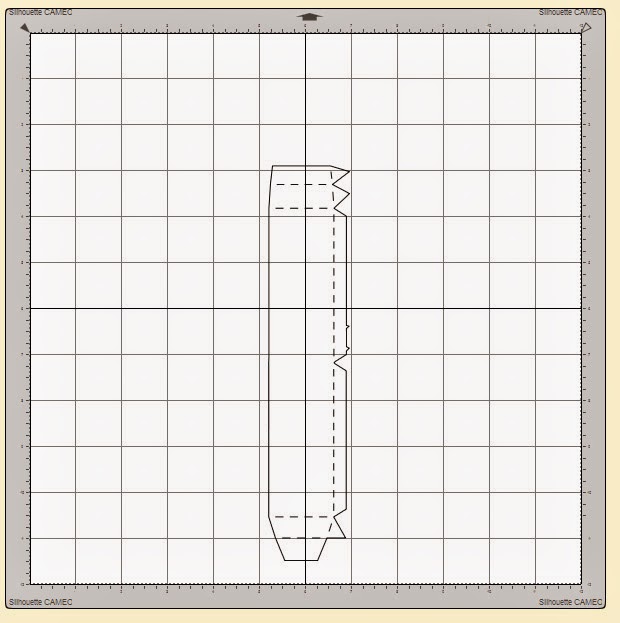
I also made the bottle a little taller.  I doubled the size by using the union tool on two of the pieces.  To do this I clear my mat of all pieces except what I am working on.  When I need to have things lined up exactly I copy and paste in place.  I decided to line my pieces up by the fold lines at the bottom and top of two pieces  -  see picture:


If you use the merge tool and you want your fold lines you have to break apart you pieces but first you need to delete the extra fold lines that you don't need.  To do this break part one of your pieces (leave the other one grouped).  Then select the parts you need to delete  -  see photo below:


Then repeat with the other piece.  What you have should look like this:


Leave your pieces ungrouped and broken apart and select both outer pieces without selecting the fold lines.  To do this click on one hold the shift key and then click on the other.  Go to path and then union.  Like this:


This should be what your new piece looks like:


Since all the pieces to the bottom of the bottle are the same you can just copy this one piece for all eight pieces you need.  Now you have a bottle that will be 4" taller and you haven't distorted the bottle by stretching it or made it any bigger round.

Here are some more pictures of the finished project:

paper champagne bottle with orchids casading out of the top standing on top of large dice

close up of orchids in champagne bottle

I still need to find some gold tape to cover the wire from the flowers, but other than that I think this is finished!

Here is a list of the kits and links to them:

New Year's Eve Kit
The Green Room Kit
Orchid Plant

I used The Paper Studio - Oh So Glam - paper stack

Friday, October 31, 2014

Witches in the Pumpkin Patch

Immediately, following the end of the Autumn challenge SVG Cuts announced a Halloween challenge.  They had mentioned earlier that they might do one so I had already made a pumpkin in preparation however I had to wait to hear what kits were going to be allowed before proceeding any further than that.

I used Graphic 45 Steampunk Spells.  I just love this collection.  I wanted to carry the theme of the paper in the pumpkin up into the top decoration.

Spooky scene with pumpkin next to headstone

In order to do this I made a bed of flowers as my base.  I have the witch on patrol for the night around her house.  The Big Jack-o-Lantern is from Fright Night, the House, Jack-o-lantern (little) and flowers are from the Haunted Forest kit.  The rosette spiderweb is in the Catacomb Manor kit, the moon is a free file and the spider is from the Spooky Soiree kit.

The house and the jack-o-lantern are scaled down to 35%.  The house is 4 and a half inches tall.

Close up of pumpkin, witches house and spiderweb

I just love the way it all turned out.

Close up of witch house and pumpkin

I think the moon added just the right touch.

SClose up of top of pumpkin showing scene of a small pumpkin, witch house, spiderweb and flowers

I glued a square piece of Styrofoam to the inside of the pumpkin and added floral wire to all the pieces (you can see it a little behind the web, from the moon), and arranged the pieces in the pumpkin.  My biggest obstacle was coming up with something to attach the wire to for the house.  So, I made a trip to Michael's.  The young lady who works there suggested using a button.  What a wonderful idea.  So I wrapped the wire around the button and then hot glued it to the bottom of the house.  This way I can still take it all apart and store it easily.

Another close up of the top of the pumpkin

I hope you enjoyed my Steampunk inspired pumpkin.  Happy Halloween.

Here is a list of the files I used:

Fright Night
Haunted Forest
Catacomb Manor
Spooky Soiree
Free Vintage Witch


Do what inspires you,

Cyndy G

Wednesday, October 1, 2014

SVGcuts Lamp Challenge

It is time again for another challenge.  This time we have to use the lamp file from Maison de Madeline Kit. I took a lot of time thinking about this one. We could use any other file from SVGcuts that we wanted to use, the shape of the the lamp could not be changed. The first sample I put together was an apple tree. The old kids hand game, say say old playmate, kept going through my head. One part of it says "climb up my apple tree". While I was working on my apple tree another contestant turned in a lamp that was a tree. Now, I know I have to push the envelope on this one.

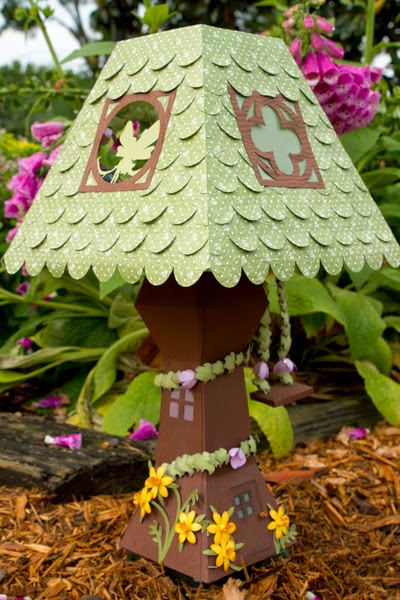
I re-read the rules a hundred times but this one time the part about using a fairy file caught my eye. When I look at the files on the SVGcuts website I found the Woodland Fairies Collection and I feel in love with the little girl sitting on the branch.

3d paper lamp in garden setting

I spent a lot of time searching the internet looking at pictures of fairy houses. Then when I was shopping at Michael's looking for anything to use with my lamp I found fairy lights in the wedding section. Now I had everything I needed to make my lamp.

I made the lamp the largest size possible to fit on the 12x12 mat. See diagrams below for how I put the doors and windows in the lamp. I also made panels for the trunk of the tree so I could emboss them without weakening the base of the lamp. I added the fairy to the lamp shades front panel.

screen shot of how to cut lampscreen shot of how to cut lampScreen shot of how to cut lamp

 I decided to put the battery pack for the lights inside the trunk of the tree.  So I waited to put the bottom on.  I put the pack inside the door and started the string of lights out the back corner of the base and wrapped it around the trunk.  Now the hard part.  It took me awhile to come up with how to use the lights inside the shade.  I also knew I wanted to have a swing that had flowers and leaves as the chains.  This image below is how I worked out the lights in the shade.

Screen shot of how to string lightsI used the tiny holes as guides and cut from the outer edge to the holes.  I took the lights up through the bottom right holes and around the arch in the back of the lamp, out through the hole on the bottom left, took the lights across the bottom of the shade (on the outside), up the next hole and right back out the one just above it, (here is where I made my swing).  I strung the lights through the board for the swing (then glued it together) and back up into the shade.  The string was just long enough (1/2 inch) to use in the bottom of the tiny lamp I made for inside the fairy lamp.

I used a bunch of leaves and flowers (I used the flowers over each light) to cover the fairy lights.  I used hot glue to put the leaves on.  I cut the flowers open from the outer edge to the center, cupped the light then glued the petals over each other to make the flower cover the light.

Then I made some furniture for my fairy house.  I used the desktop jar from Happy Trails for the potbellied stove and used a tea light to make it look like a fire in the stove, the pool table from The Green Room for the bed, the pedestal from Poplar Street Tulips as a table and the free Adirondack chair at the table and a mini lamp.
Close up of lamp in garden

Inside of lamp showing a small fairy house

View inside lamp showing fairy bed and clock

Close up of door and swing on lamp

Picture of lamp lit up

inside of lamp lit up showing a glowing pot belly stove

I won first price with this entry!  I have to admit, I got butterfly's when I was putting it together.  I knew I had made something special.  I still can't believe I won.  I don't know if that will ever sink in!  The price for first place is a Silhouette Cameo!  How great is it that Leo and Mary of SVGcuts have such wonderful giveaways.


Monday, September 22, 2014

SVG Cuts - Autumn Challenge

Happy Autumn!  I love autumn.  The warm colors are very soothing, the cooler air is a nice break from the long hot days of summer.  Here in North Carolina fall starts slowly.  It cools off a little at night and the mornings are a little crisp.  Winter comes slowly.

Well with the start of fall SVG Cuts started a new challenge.  The grand prize is your choice of a Silhouette Cameo or photography by Leo Kowal.  It is a beautiful three piece fall themed canvas print and I know just where I would hang them!  Fingers crossed.

My entry was inspired by the children's book, One Enchanted Evening.  The book is illustrated in beautiful warm earth tones and makes me think of fall.  Everything used is from a kit or collection by SVG Cuts.  If anyone has any questions about how I put any of the pieces together I would be happy to share.

One enchanted evening scene


Here is a list of the files I used:

Crickets:

Body (size pieces for Groom 3% bigger)
Christmas Open House
Snowman Body and Panels and Hat

Silent Night  - Christmas Light Bulb and panels  - bottom pieces
Leaves Are Falling  -  Scarecrow  -  Head  -  Scale to 32% (3.264 wide)

Arms
Kate's Holiday Silhouettes -
Couple Under Mistletoe - figure - Groom's arms
Child Baking - figure - Bride's arms
Legs
Crisp Days of Fall
Scrapbook Page - Silhouette -trim upper leg to use for bride and groom
Antennae
My Big Day
Swirly

Bow Tie
Alice's Cuddly Friends
Mad Hatter - Bow Tie

Gazebo
Top  -  Popular Street Tulips – Egg Bottom
                          French Quarter Ironworks
Carousel Ride - Top (only six pieces)
B is for Birthday – Candle
Winter Gazebo - Bottom

Garland
3D Mums and Fall Flowers
Fall Frames and Elements
Caramel Apple Pie

Basket of Flowers
Harvest Hill Farm
Crisp Days of Fall

Wednesday, August 20, 2014

Carousel Ride

Whew, what a week so far.  My husband and I took some well deserved time to ourselves for the past few days (thank you Mom), only to return home in time to send the kids to school for their first day of school!  We went to one of our favorite places, Charleston.  I hope I will have time to post some of my pictures tomorrow.

I also returned in time for the release of svgcuts newest kit Carousel Ride.  I have been trying to create a carousel myself for some time now.  Thank you Mary for finishing the job for me!  I have to admit, yours worked out much better than mine.  The file is actually made as a cupcake holder.  I changed mine to be just a carousel, I didn't have time to bake today.

This file really tested me.  The top was a little tricky.  I love the way it turned out, here are some pictures:

3d paper carousel

For the placement of the poles I added a small circle (.108) in center of each circle meant for the cupcakes.  This then allowed me to keep the horses space equally.  I also added the holes to the top liner so the poles would be straight.  To do this I centered the bottom piece (grouped) on the mat, ungrouped the bottom pieces, grouped all the small holes together, copied and pasted in place, with the small circles still selected hold down the shift key and select the bottom liner and group together, move this piece off the mat.  You should still have the small circles centered on the mat.  Next, center the top piece, select all the small circles and top piece and group together.  Now the top should line up with the bottom and you will have guidance for placing the poles.

3d paper carousel

3d paper carousel ride

To hold the poles in place I filled the little holes with glue then stuck the poles on.  You have to make sure to let them dry completely or they will move.

3d paper carousel ride

Tuesday, August 5, 2014

Bedtime Stories SVG Kit

Bedtime Stories SVG Kit is still a favorite of mine.  I love the nursery rhyme projects in this kit.  So, when my sister asked me if I could make some favor boxed for her nurses baby shower, I knew I wanted to used the castle somehow.  I remember my mom saying "That does look very babyish" when I showed her the picture.  Then Brigit posted her project,  Humpty Dumpty Treat Holder, and my project was born.

I used the following kits to create my center piece and treat boxes:

Bedtime Stories
Moonlight Garden Party
Camp S'mores
Cuddly Storybook Friends SVG Collection


Mother goose themed baby shower

Humpty Dumpty sitting on the wall of a castle gift box

close up of Ole King Cole

Humpty Dumpty treat boxes

Castle gift box


Saturday, August 2, 2014

Haunted Forest SVG Kit

Wow, I just love this new kit from SVGcuts, Haunted Forest SVG Kit (follow the link to their page to find the file)!  Mary makes the most awesome houses.  This one is now my favorite.  It went together perfectly.  I rarely have problems putting svgcuts files together.  They take so much time to make sure everything is just right.  That's what you get with quality.  I made the haunted house out of this kit.  I love how it turned out.  The detail is over-the-top!  If you've been on the fence about purchasing some of their files, I assure you you won't regret it.  Not only do you get the best designs, you get the best customer service in the business!  Anyway enough gushing, here are the pictures of my witch's house...

Witches cabin made out of paper

How cool do those webworms look in the background.  Don't worry, they actually don't harm the tree, they will be gone in a few weeks.  But they sure do make for a spooky background.

close up of roof detail on witches cabin

side view of witches cabin showing spider on wall

Front view of witches cabin

Oh, yeah I used paper from Midnight Magic by Mambi (I think, I pulled all the paper out of the pad).  I picked it up on clearance last year after Halloween.

Tuesday, May 20, 2014

SVGcuts Halloween Challenge

As the holidays drew close SVGcuts did another contest.  This time we had to create a Halloween scene using any Halloween file from SVGcuts.  This was right up my alley.  I had been wanting to create a village scene of the Nightmare Before Christmas, so I knew right away what I wanted to do.

During this time My mom and sister Teresa had gone to the Susan G. Komen race.  The race that my mom fell at and broke her arm.  She had her hands full carrying in everything she needed to do her job at the race.  She tripped on a section of the sidewalk that was uneven (it was still dark - she had to be set up by 6am) and she didn't notice the sidewalk.  With her arms full she couldn't do anything to slow down her fall and she fell with all her weight on her arm hitting the curb.  She said she heard it break!  I could only imagine.  I had been working that morning so, I didn't find out until late that afternoon what had happened.

Well during all this I found out the the contest was ending a week sooner than I thought it was.  I had laid out the project on the computer but I had not put anything together.  I was very proud of what I had and I worked tirelessly to get it done.  Thursday, Friday and Saturday I worked until 3am and got up at 7am to start working.  Sunday night at 11pm eastern time (contest was on central time so I had two hours) I took pictures and raced to get them uploaded.  I was very nervous because our computer has never been right since our house was struck by lightning.  The insurance company refused to replace the computer because it "worked", even though it barely worked, but that is a story for another day.  Like it often does it would not finish loading my photos.  I sat at the computer for over 20 minutes watching it try to upload my photo and at mid-night (central time) the contest closed and my photo never made it.  I was crushed.  I posted my photo to their facebook page and Thienly (one of their design team members at the time) talked with Leo and Mary and they opened the page for me to load my photo.  That really meant a lot to me.  I had worked so hard.  I felt God was giving me a little boost for helping my mom.  I really wanted to earn the $6.99 gift card they give to everyone who enters their contests.   A great big THANK YOU to Leo and Mary for allowing me to enter the next day.  Here is picture of the village I created.


Nightmare before Christmas scene made out of paper

Now here are some side-by-sides of my inspiration:

NBC town hallNBC town hall


Jack SkellingtonJack Skellington with coffin sleigh - NBC
Hanging tree
NBC - Hanging tree and graveyard

NBC Jack Skellington's house
Jack Skellington's house
I love the way this turned out.  I still want to make some more of the houses from the movie but I don't know when I will be able too.  Maybe there will be a contest that allows me to use the files I need to make the rest of them.  Contests seem to be the only time I get to make things for myself.