Tuesday, December 16, 2014

Santa's Tool Box

I can't believe that Christmas is only eight days away!  For my project today I used the JGW Tools Rule Set.  I needed some stocking stuffers for my boys.  I love the way this Tool Box turned out.  I enlarged the front panel so I could add Santa's with a Stencil font.

3d paper Santa's tool box


I cut the tool box out at the size it imports at.  It is about 4.5 inches tall and 5.5 inches wide.

paper power drill and wrench made with bright Christmas paper


The tools I shrunk to 4.5 inches long.  They are the perfect size for the little candy canes.  You could even put a chap stick in the wrench and a small chocolate Santa in the power drill.  These will fit perfectly a stocking.  I love the small size.  This  is a quick and easy project that you can complete in a day.

Scene of a stuffed Santa sitting by the tree with his tool box and tools


I hope everyone has a very Merry Christmas.  I would love to see what you have been working on for the Holiday season!  Until next year.  Happy Crafting.

Do what inspires you,

Cyndy G

Tuesday, December 2, 2014

Sitting Santa

I have to admit I love everything Christmas!  I am one of those people who can hardly wait for Thanksgiving weekend so I can decorate and start playing Christmas carols.  For my post today I am sharing my Sitting Santa.  I made him using the following kits:

JGW Sam the Scarecrow  -  Cut all scarecrow pieces to size (except face)
Winter Fun Photo Props  -  Santa
Cozy Christmas Captions  -  Believe

I love the way he turned out!  My mom thought he was made of wood.

I used the body pieces of the scarecrow ledge sitter and the only thing I changed was the size of the gloves.  I sized mine to 3.360 x 4.144  (make sure to uncheck the keep proportions box.).  I wanted mine to be a little smaller.

paper "wooden block" Santa sitting by the Christmas tree


Fur around pants - Winter Photo Props/Santa

For his face and hat I used the Winter Photo Props - Santa file.

Close up of Santa's face showing a cheery smile and big eyes

TIP - for the back of the Santa make sure you flip the hat and hat fur pieces before you cut them so they are a mirror image of the ones on the front, especially if you use a patterned paper.

wood block Santa

I decided he needed a belt and I used basic shapes to make one. 
 I used the rectangle and the square frame.

Close of sign Santa is holding that says Believe

As a finishing touch I used the Believe caption from Cozy Christmas Captions.  
I sized the width to 9.021 (keep proportions) and used some cute clothes pins 
I found at Michaels in their dollar bin.

paper "wooden block" Santa sitting by the Christmas tree

I would love to see your version of the sitting Santa!

Merry Christmas,
Cyndy G

Tuesday, November 18, 2014

Christmas Tree Advent Calendar

For this post I decided to tackle the JGW Tree Stack Box.  I have seen several in green and a beautiful white one in our Winter Blog Hop this past weekend.  I wondered how it would look if I used several different patterned papers for the drawers.

3d Christmas tree advent calendar with box drawers

I am very pleased with the result.  I used 15 sheets of paper for this.  I know this sounds like a lot but it didn't feel like it.  I used 6 patterned papers (one set of four drawers will fit on one 12x12 sheet), 4 sheets of red and 5 sheets of brown.  I even made use of the half tree wedges (these are so you can use a 8.5 x 11 sheet of paper).  If you put a whole tree wedge in the center of a 12x12 page you can fit two half's upside down on either side.  This enabled me to cut the six wedges with only 3 sheets of paper!

close up of drawers in advent calendar


I used little buttons instead of eyelets.  I also decided that I would put little red bows in the drawers.  When the tree is finished being decorated it is Christmas Eve!

I know this tree looks like a very daunting task to put together but it is a simple project.  The hardest thing about this project is that there are 24 little boxes and 24 little slots for the boxes to slide in.  So it takes time to put these 48 pieces together.  The result is well worth it.  It looks very complicated and you will get a lot of oohs and aahs over this one.  So far this is one of my favorite projects.

close up of tree topper - says 25

December 1st is right around the corner but there is still time to get an advent calendar finished!

I think this would look great in any color combination.  I would love to see your version of the tree or any other project you have made with our files on our facebook page!  Thank you for stopping by to see my project.

Do what inspires you,
Cyndy :)

Saturday, November 15, 2014

Winter Wonderland Blog Hop

UPDATE - You can now purchase this little snowman as a kit at SVG Attic.  SDS Frosting the Snowman.

Welcome to the SVG Attic-SnapDragon Snippets Winter Wonderland blog hop!  We are so excited to have you join us today!


At each stop of the hop we hope you will be inspired by the creativity of the design teams of SVG Attic and Snapdragon Snippets. You are sure to find many wonderful projects that will be at the top of your crafting lists! If you happened across this post out of order, please head to the SVG Attic blog to start at the beginning of the hop.

Here is the project I created for this hop:

Christmas is my favorite time of year.  I love all the decorations!  I especially like snowmen.  So I created one for you today.

3d paper snowman with top hat

I made him using the SDS 3D Cake Box Kit as my snowman.  It worked perfectly!  I used my snowflake embossing folder on the cake panels and chalked them with blue to help it pop.

close up of snowman face

I used the Leprechaun Hat from the SDS Charmingly Green Kit for the hat.

view looking down on snowman showing hat

And the SDS Ice Princess Party Pack for the snowman's face, arms and buttons.  I love the detail in the cute little carrot nose and that the eyes and buttons are not perfectly round to give them the look of coal.  Finally, I added a little piece of holly from the Winter Fun Photo Props and some cute snowman ribbon I found on clearance last year.  

Here is a list of the kits I used:


I hope you have enjoyed my project.  Angeline is up next. 

Now how about some blog hop prizes??

$15 Gift Certificate to SVG Attic


and
$15 Gift Certificate to SnapDragon Snippets


What do you need to do to be eligible for these amazing prizes?

  1. Become a follower of each blog in the hop, if you aren't already.  We have some different blogs since our last hop, so please check to make sure you are following them all!
  2. Leave some comment love at each stop.
  3. If you do both of the above, check the SVG Attic blog and/or the SnapDragon Snippets blog for the winners on Monday, November 17th!  You have all day today and tomorrow to hop. 

We would also love it if you would stop by the SVG Attic and SnapDragon Snippets' Facebook pages and give us a "Like"!

Now for the blog hop lineup:
Cyndy (you are here)
Beth 

I hope you have enjoyed this stop on our hop!  Be sure to head on over to the other stops for more Winter Wonderland  inspiration, comment and become a follower to be eligible for the prizes!

Tuesday, November 4, 2014

It's a Frozen Party

Anyone who has a little girl right now knows that they want everything Frozen.  So it came as no surprise to me when my daughter, who is 4 yrs old told me she wants a Frozen party.

So I decided to change the Sweet Shop Party kit into a Snowball Shop by using elements from the SDS Ice Princess Party Pack and Cozy Christmas Captions.

Frozen theme party favors


I added a snowflake from the gift bag  to side of the shop.  To cut the design into the side panel place the snowflake where you want it, then ungroup the file.  Once you have the object ungrouped select the outer most circle and delete it.  Now when you cut the panel you will have the design cut into the piece not just a big circle.  I cut a snowflakes in a dark blue to place on the outside.  I liked the look of the snowflake turned a little so it wasn't exactly lined up.

Frozen themed cupcake holder with olaf


I made a "build a snowman" treat bag using the place card.

Frozen themed build a snowman snack.  Marshmallows for body, pretzel sticks for arms, candy corn for nose

Finally, I made up some of the cracker boxes and popcorn cups for treats to complete my party favors.

Frozen themed treat cups


Here is a list of the kits I used:

Sweet Shop Party Kit 
SDS Ice Princess Party Pack
Cozy Christmas Captions

The paper I used was Winter Fun by Carta Bella, it is available in digital format.  Until next time.

Do what inspires you,
Cyndy G


Sunday, November 2, 2014

Casino Night - Volunteer

My boys attend Saint Michaels Catholic School.  This year we have a new principal and she wants to do a casino night for a fundraiser.  So I volunteered to be on the decorating committee and thought my craft might come in handy.

So I turned to SVG Cuts for the Champagne bottle and dice; and Craftsuprint for the orchid.  I found these nice gold painted branches at Hobby Lobby.  Here is what I put together:

paper champagne bottle with orchids casading out of the top standing on top of large dice

I found some art deco designs to add to the bottle to give it a little more design.

How did I do it?  I attached the flowers to floral wire (silver) with a hot glue gun and attached a little circle on the back to hid the glue a wire on each flower.  Then I attached the wire to the branch by twisting it on about an inch above the top of the bottle and curved it give it the feel of a fountain.  It didn't take much wire to attach to the branch, I left about two inches.

I also made the bottle a little taller.  I doubled the size by using the union tool on two of the pieces.  To do this I clear my mat of all pieces except what I am working on.  When I need to have things lined up exactly I copy and paste in place.  I decided to line my pieces up by the fold lines at the bottom and top of two pieces  -  see picture:


If you use the merge tool and you want your fold lines you have to break apart you pieces but first you need to delete the extra fold lines that you don't need.  To do this break part one of your pieces (leave the other one grouped).  Then select the parts you need to delete  -  see photo below:


Then repeat with the other piece.  What you have should look like this:


Leave your pieces ungrouped and broken apart and select both outer pieces without selecting the fold lines.  To do this click on one hold the shift key and then click on the other.  Go to path and then union.  Like this:


This should be what your new piece looks like:


Since all the pieces to the bottom of the bottle are the same you can just copy this one piece for all eight pieces you need.  Now you have a bottle that will be 4" taller and you haven't distorted the bottle by stretching it or made it any bigger round.

Here are some more pictures of the finished project:

paper champagne bottle with orchids casading out of the top standing on top of large dice

close up of orchids in champagne bottle

I still need to find some gold tape to cover the wire from the flowers, but other than that I think this is finished!

Here is a list of the kits and links to them:

New Year's Eve Kit
The Green Room Kit
Orchid Plant

I used The Paper Studio - Oh So Glam - paper stack

Friday, October 31, 2014

Witches in the Pumpkin Patch

Immediately, following the end of the Autumn challenge SVG Cuts announced a Halloween challenge.  They had mentioned earlier that they might do one so I had already made a pumpkin in preparation however I had to wait to hear what kits were going to be allowed before proceeding any further than that.

I used Graphic 45 Steampunk Spells.  I just love this collection.  I wanted to carry the theme of the paper in the pumpkin up into the top decoration.

Spooky scene with pumpkin next to headstone

In order to do this I made a bed of flowers as my base.  I have the witch on patrol for the night around her house.  The Big Jack-o-Lantern is from Fright Night, the House, Jack-o-lantern (little) and flowers are from the Haunted Forest kit.  The rosette spiderweb is in the Catacomb Manor kit, the moon is a free file and the spider is from the Spooky Soiree kit.

The house and the jack-o-lantern are scaled down to 35%.  The house is 4 and a half inches tall.

Close up of pumpkin, witches house and spiderweb

I just love the way it all turned out.

Close up of witch house and pumpkin

I think the moon added just the right touch.

SClose up of top of pumpkin showing scene of a small pumpkin, witch house, spiderweb and flowers

I glued a square piece of Styrofoam to the inside of the pumpkin and added floral wire to all the pieces (you can see it a little behind the web, from the moon), and arranged the pieces in the pumpkin.  My biggest obstacle was coming up with something to attach the wire to for the house.  So, I made a trip to Michael's.  The young lady who works there suggested using a button.  What a wonderful idea.  So I wrapped the wire around the button and then hot glued it to the bottom of the house.  This way I can still take it all apart and store it easily.

Another close up of the top of the pumpkin

I hope you enjoyed my Steampunk inspired pumpkin.  Happy Halloween.

Here is a list of the files I used:

Fright Night
Haunted Forest
Catacomb Manor
Spooky Soiree
Free Vintage Witch


Do what inspires you,

Cyndy G

Tuesday, October 28, 2014

Snap Dragon Snippets - Grand Re-Opening


Huge new!  Come join us as we celebrate the Grand Re-opening of snapdragonsnippets.com.

Register on the site for a chance to win a Silhouette Portrait (Winner will be announced on our the Snapdragon Snippets Scrapbooking Facebook Page, Monday Nov 3). Plus everyday we will be giving away a $10 giftcard to the store.  For more chances to win, Share our Facebook Adverstisement or make a purchase form the store (A max of 3 chances to win per person).   See FB page for all the details.

Don't miss out.  Lots of fun to be had.  Meet our 10 great designers and new designs daily.

And if that wasn't enough we are 40% off.  Come and invite your friends. 


Tuesday, October 21, 2014

Halloween Canning Jars ~ with Cyndy G

I can't believe Halloween is just a little more than a week away!  There is still time to get one more Halloween project in.  Today I am sharing the JGW Canning Essentials Kit SDS Spooky Cards and the SDS Skull Medallion.  As soon as I saw the Jars I knew what I wanted to do with them.

Haunted scene of 3d paper Halloween jars

I love the way they turned out!  I shrunk the cards down to make tags out of them.


Close up of 3d paper Halloween jar with eyeball gumballs inside

3d Halloween jar with witches fingers inside


I used the cross bones as my poison symbol on the jars and my favorite touch was adding a red oval to the end of the pickle to make it look like a witch's finger!

Close up of Frankenstein tag on Halloween Jar

My kids loved these jars.  I was informed that they like the big jar best.  When I asked why they said "Because you can eat what's in it."  I should have known that.

Close of witch's hat tag on Halloween jar

I filled the jar with eyeball gum that I found at Michael's.  What a fun project.  I love the versatility these sets have.

What I used to create this project:
JGW Canning Essentials Kit,
SDS Spooky Cards
SDS Skull Medallion.
Simple shapes - Oval
Teresa Collins Haunted Hallows paper
Eyeball gum

Please post pictures on our FB page of the ways you have used this set, I would love to see them!  Until next time.

Do what inspires you,
Cyndy G

Thursday, October 9, 2014

Hello everyone!  My name is Cyndy Gustashaw.  I am new to the SVG Attic I-team.  I hope I am able to inspire you with my personal touches using SVG Attic files and hope you will enjoy using them as much as I do.

I am married to a wonderful man who puts up with my crafts/hobbies and even encourages them.  He hopes that I can find a way to make BIG money so he can retire, lol.  Together we have three beautiful children, in addition to my two girls, that makes five children.  My father-in-law lives with us and my Mom retired when we had our second child and left her home in Southern California to move to North Carolina and be a full-time Grandmother and nanny.  


I have lots of favorite projects.  I put a little piece of me in everything I create so they are all special.  For my introduction I have chosen the JGW Pumpkin Stacker.  I fell in love with it as soon as I saw it and for once I knew exactly what paper I was going to use!

3d paper pumpkin countdown to Halloween

I used Graphic 45, An Eerie Tale for this project.
I absolutely love this paper stack!

Close up of 3d pumpkin


I reduced the size of this project to 75%.  It is still a sizable project the pumpkin stands almost 7" tall and the base is just over 6".  I almost always shrink my projects.  At first it was to conserve paper but everyone in my family loved the smaller sizes so now it is a preference.

close up of Halloween tag on 3d pumpkin

I love the cute little stem.  My daughter even commented on how real it looks.  Thank you for visiting my blog post today, I look forward to sharing with you and would love for you to share your projects with us!


Do what inspires you!
Cyndy G.

Wednesday, October 1, 2014

SVGcuts Lamp Challenge

It is time again for another challenge.  This time we have to use the lamp file from Maison de Madeline Kit. I took a lot of time thinking about this one. We could use any other file from SVGcuts that we wanted to use, the shape of the the lamp could not be changed. The first sample I put together was an apple tree. The old kids hand game, say say old playmate, kept going through my head. One part of it says "climb up my apple tree". While I was working on my apple tree another contestant turned in a lamp that was a tree. Now, I know I have to push the envelope on this one.

I re-read the rules a hundred times but this one time the part about using a fairy file caught my eye. When I look at the files on the SVGcuts website I found the Woodland Fairies Collection and I feel in love with the little girl sitting on the branch.

3d paper lamp in garden setting

I spent a lot of time searching the internet looking at pictures of fairy houses. Then when I was shopping at Michael's looking for anything to use with my lamp I found fairy lights in the wedding section. Now I had everything I needed to make my lamp.

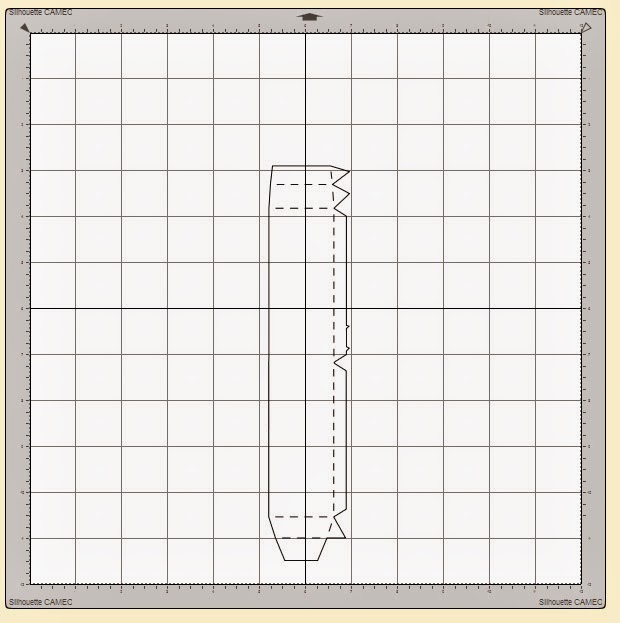
I made the lamp the largest size possible to fit on the 12x12 mat. See diagrams below for how I put the doors and windows in the lamp. I also made panels for the trunk of the tree so I could emboss them without weakening the base of the lamp. I added the fairy to the lamp shades front panel.

screen shot of how to cut lampscreen shot of how to cut lampScreen shot of how to cut lamp

 I decided to put the battery pack for the lights inside the trunk of the tree.  So I waited to put the bottom on.  I put the pack inside the door and started the string of lights out the back corner of the base and wrapped it around the trunk.  Now the hard part.  It took me awhile to come up with how to use the lights inside the shade.  I also knew I wanted to have a swing that had flowers and leaves as the chains.  This image below is how I worked out the lights in the shade.

Screen shot of how to string lightsI used the tiny holes as guides and cut from the outer edge to the holes.  I took the lights up through the bottom right holes and around the arch in the back of the lamp, out through the hole on the bottom left, took the lights across the bottom of the shade (on the outside), up the next hole and right back out the one just above it, (here is where I made my swing).  I strung the lights through the board for the swing (then glued it together) and back up into the shade.  The string was just long enough (1/2 inch) to use in the bottom of the tiny lamp I made for inside the fairy lamp.

I used a bunch of leaves and flowers (I used the flowers over each light) to cover the fairy lights.  I used hot glue to put the leaves on.  I cut the flowers open from the outer edge to the center, cupped the light then glued the petals over each other to make the flower cover the light.

Then I made some furniture for my fairy house.  I used the desktop jar from Happy Trails for the potbellied stove and used a tea light to make it look like a fire in the stove, the pool table from The Green Room for the bed, the pedestal from Poplar Street Tulips as a table and the free Adirondack chair at the table and a mini lamp.
Close up of lamp in garden

Inside of lamp showing a small fairy house

View inside lamp showing fairy bed and clock

Close up of door and swing on lamp

Picture of lamp lit up

inside of lamp lit up showing a glowing pot belly stove

I won first price with this entry!  I have to admit, I got butterfly's when I was putting it together.  I knew I had made something special.  I still can't believe I won.  I don't know if that will ever sink in!  The price for first place is a Silhouette Cameo!  How great is it that Leo and Mary of SVGcuts have such wonderful giveaways.